UNDERSTANDING HEADSAIL FURLING SYSTEMS
by Bill Hooper
FURLER DEVELOPMENT AND HOW RACING INFLUENCED DESIGN
Before Furling and still today sailors have, and do carry, different sized head sails to accommodate various wind conditions and by selecting the correct combination of sails and reefing choices, the boat found a comfortable attitude while underway. Racing sailors, concerned with optimum performance through these ranges of wind velocities, carried even a larger inventory of sails to fit every need. Along with them came a crew to make the necessary and efficient sail changes to keep the boat going as fast as could be expected. Of course this activity remains a popular past time, but furling gear has never-the-less found a place with both cruising and racing venues.
Companies like Schaefer and Merriman made early furling units for the cruising sailor that either accommodated the existing jib hanks, or employed wire luffs like a staysail into the fabric. Now they could hank on one large genoa and control its size from the cockpit. While neat at the time, these were found cumbersome and they mostly worked best in ideal conditions. There grew a need for furling units to work better in all sea and wind conditions and to accommodate better sailing performance. Stearns manufactured the ever popular Stearns Twin-Stay with an aluminum extrusion that replaced the forestay (as did Hood & a few others). It incorporated two grooves, 180 degrees from each other, to accommodate a luff tape sewn into the luff of the headsail - a system akin to the larger bolt rope which replaced mast hoops on a mainsail for the luff and foot. This made headsail changes faster and more efficient. As technology advanced, extrusions were designed to rotate around the head stay increasing the strength of the system.
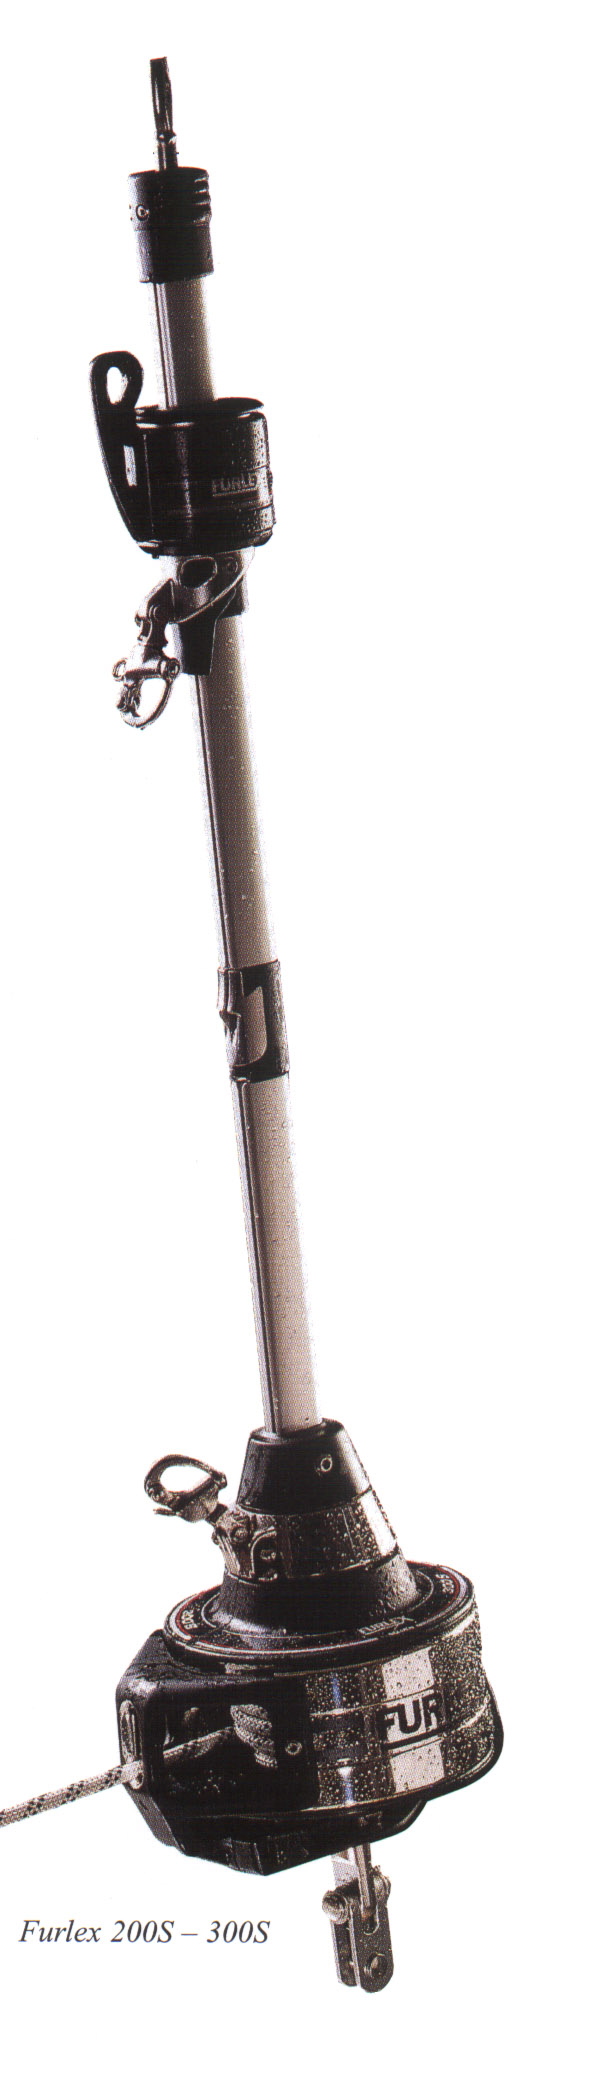
The basic components to most furling systems include the foil extrusion, which rises out of the lower drum and incorporates a feeder in which the sail's luff tape enters the groove. Then there is the upper swivel (in most systems - but not all) and the furling line and associated hardware to route the furling line aft to the cockpit.
|
While systems like the Stearns Twin Stay were well received, racers still recognized the drums at the bottom and swivels at the top shortened the maximum luff of the headsail which reduced wanted sail area. Furling manufacturers responded with split drums and side-by-side double luff grooves to accommodate the racing element of sailing. The split drums temporarily removed the furling feature so head sails with maximum hoists could be used and the double grooves enabled foredeck crews to raise a second sail before dropping the existing sail so that one never sailed "bald-headed", a problem experienced with the hank-on sails.
Multiple head sails handled by efficient crews on many race boats have still not been entirely displaced by furling units. For many, the fun of racing, includes pitting boats, gear and sails handled by crews working together to out-perform their competitors in keen, friendly contests on all levels of sailing competition. This remains an important dimension to the sport of sailing. But furlers have found a place with the more casual racer not interested in multiple and sometimes frequent headsail changes and many high-performance one-design builders. Companies like J/Boats are incorporating furling units as standard features to offer an enticing concept of racing even large boats with smaller crews with ease. In one-design racing, all boats are built the same, are equipped with the same inventory of measured sails and have no need to change head sails. Boats such as the J/80 (26') all the way up to the J/145 (48') have class sails that include a smaller jib and a large main. While many one-design boats are known to be fast in most wind conditions, with class-allowed sails, a boat raced in open club handicap racing situations, such as PHRF, can add a larger non-class furling headsail to their inventory. This allows a one-design boat to compete in lighter air conditions against boats with larger inventories of headsails available to them.
Genoas that furl have been recognized as not being as efficient when furled as individual sails of different sizes bent on to accommodate different winds. But sail makers, through time, have learned to develop furling genoas to be much more efficient for performance sailing. Their construction methods go beyond the basic cross-cut panel layouts and the addition of foam or rope luff tapes creates the draft that was formerly lost in the process of furling. And, like all sail development, what is learned on the race course in competition, trickles down to the benefit of the cruising sailor in terms of sail shape and performance which is important in reaching the next landfall more quickly.
THE NUTS AND BOLTS OF FURLER BENEFITS
Some years ago I, along with a few other fellow sailors, were day sailing on the Chesapeake aboard a Mason 43 equipped with not only a jib furling system, but also a furling system for the mainsail. When the day started the wind was minimal and we chose to motor out past the Annapolis Naval Academy and out into the large bay. Some time later the wind presented itself and we turned off the inboard and pulled two lines to enter the pleasant status of being under sail. One of the lines was the jib sheet and the other the main outhaul control and we were off to a pleasurable day of sailing. When the day was done, we sailed back to the mouth of the marina, started the engine and headed for the dock. To stow the sails, we pulled two other lines and our sails were quickly and effortlessly stowed. As one looked around at neighboring boats that had just returned to the same marina, you could see their jobs were not complete, as they had sails to fold or roll and then bag or cover. This is about the most simplistic description of the benefits of mechanically furling sails. But there's more.
When a head sail, at the end of the day, must be folded and bagged and stowed, where do you put it? Most likely below. If you have three or more headsails, each takes up that much more space below. Unless you have a generous sail locker most likely they will take up some of the living area of your vessel. And, if you had a variety of wind conditions that day so that you had to deploy more than one size headsail, you had to fold and bag each. If, while sailing, the wind piped up so that you had to take your 150% genoa down and hank on a 95% jib, you had to get on deck at least three times to deal with your headsails. One time to hank on the genoa, one or two times to pull it down and then snap on the new jib and another time to remove the jib at the end of the day. If you were alone on such a day sail, you probably had to turn on an auto-pilot or wished you owned one so that you could leave the helm to accomplish these foredeck tasks. And, if the weather made an abrupt change for the worse, so that the winds and seas increased to uncomfortable levels, you were less than anxious to feel your way forward to make a headsail change for fear you might be tossed off the boat.
So, the obvious advantages of a roller furling jib system are the convenience of deploying and stowing the sail, the ease of reefing in lieu of headsail changes, and safety because you do not have to leave the security of the cockpit where you also can have control of the helm should you be alone.
FURLING SYSTEM DIFFERENCES
Unlike 20 years ago, when there were dozens of furling manufacturers presenting their products, today there remains fewer selections to choose from. The majority used several sections of aluminum extrusions fitted together end to end and a few use a single length extrusion made from a flexible plastic. Both types have grooves to accept luff tape of various sizes dictated by the size of the boat and the designed sail area, but not all have double grooves. Generally speaking, those with a flexible extrusion are recommended for a trailerable boat while aluminum systems are recommended for non-trailerable boats. But, this is not hard and fast as many trailerable boat owners have aluminum systems installed and the manufacturers of the flexible systems make units designed for large boats. If one raises and lowers their mast frequently, as a trailerable sailor is known to do, then a flexible furler has proven to be less vulnerable to damage during this process. If careful, however, an aluminum system is suitable as well. There are a number of trailerable boat owners who leave their boats in the water all season and regardless of the size of the boat, a mast can be stepped or unstepped with an aluminum-type system without incident.
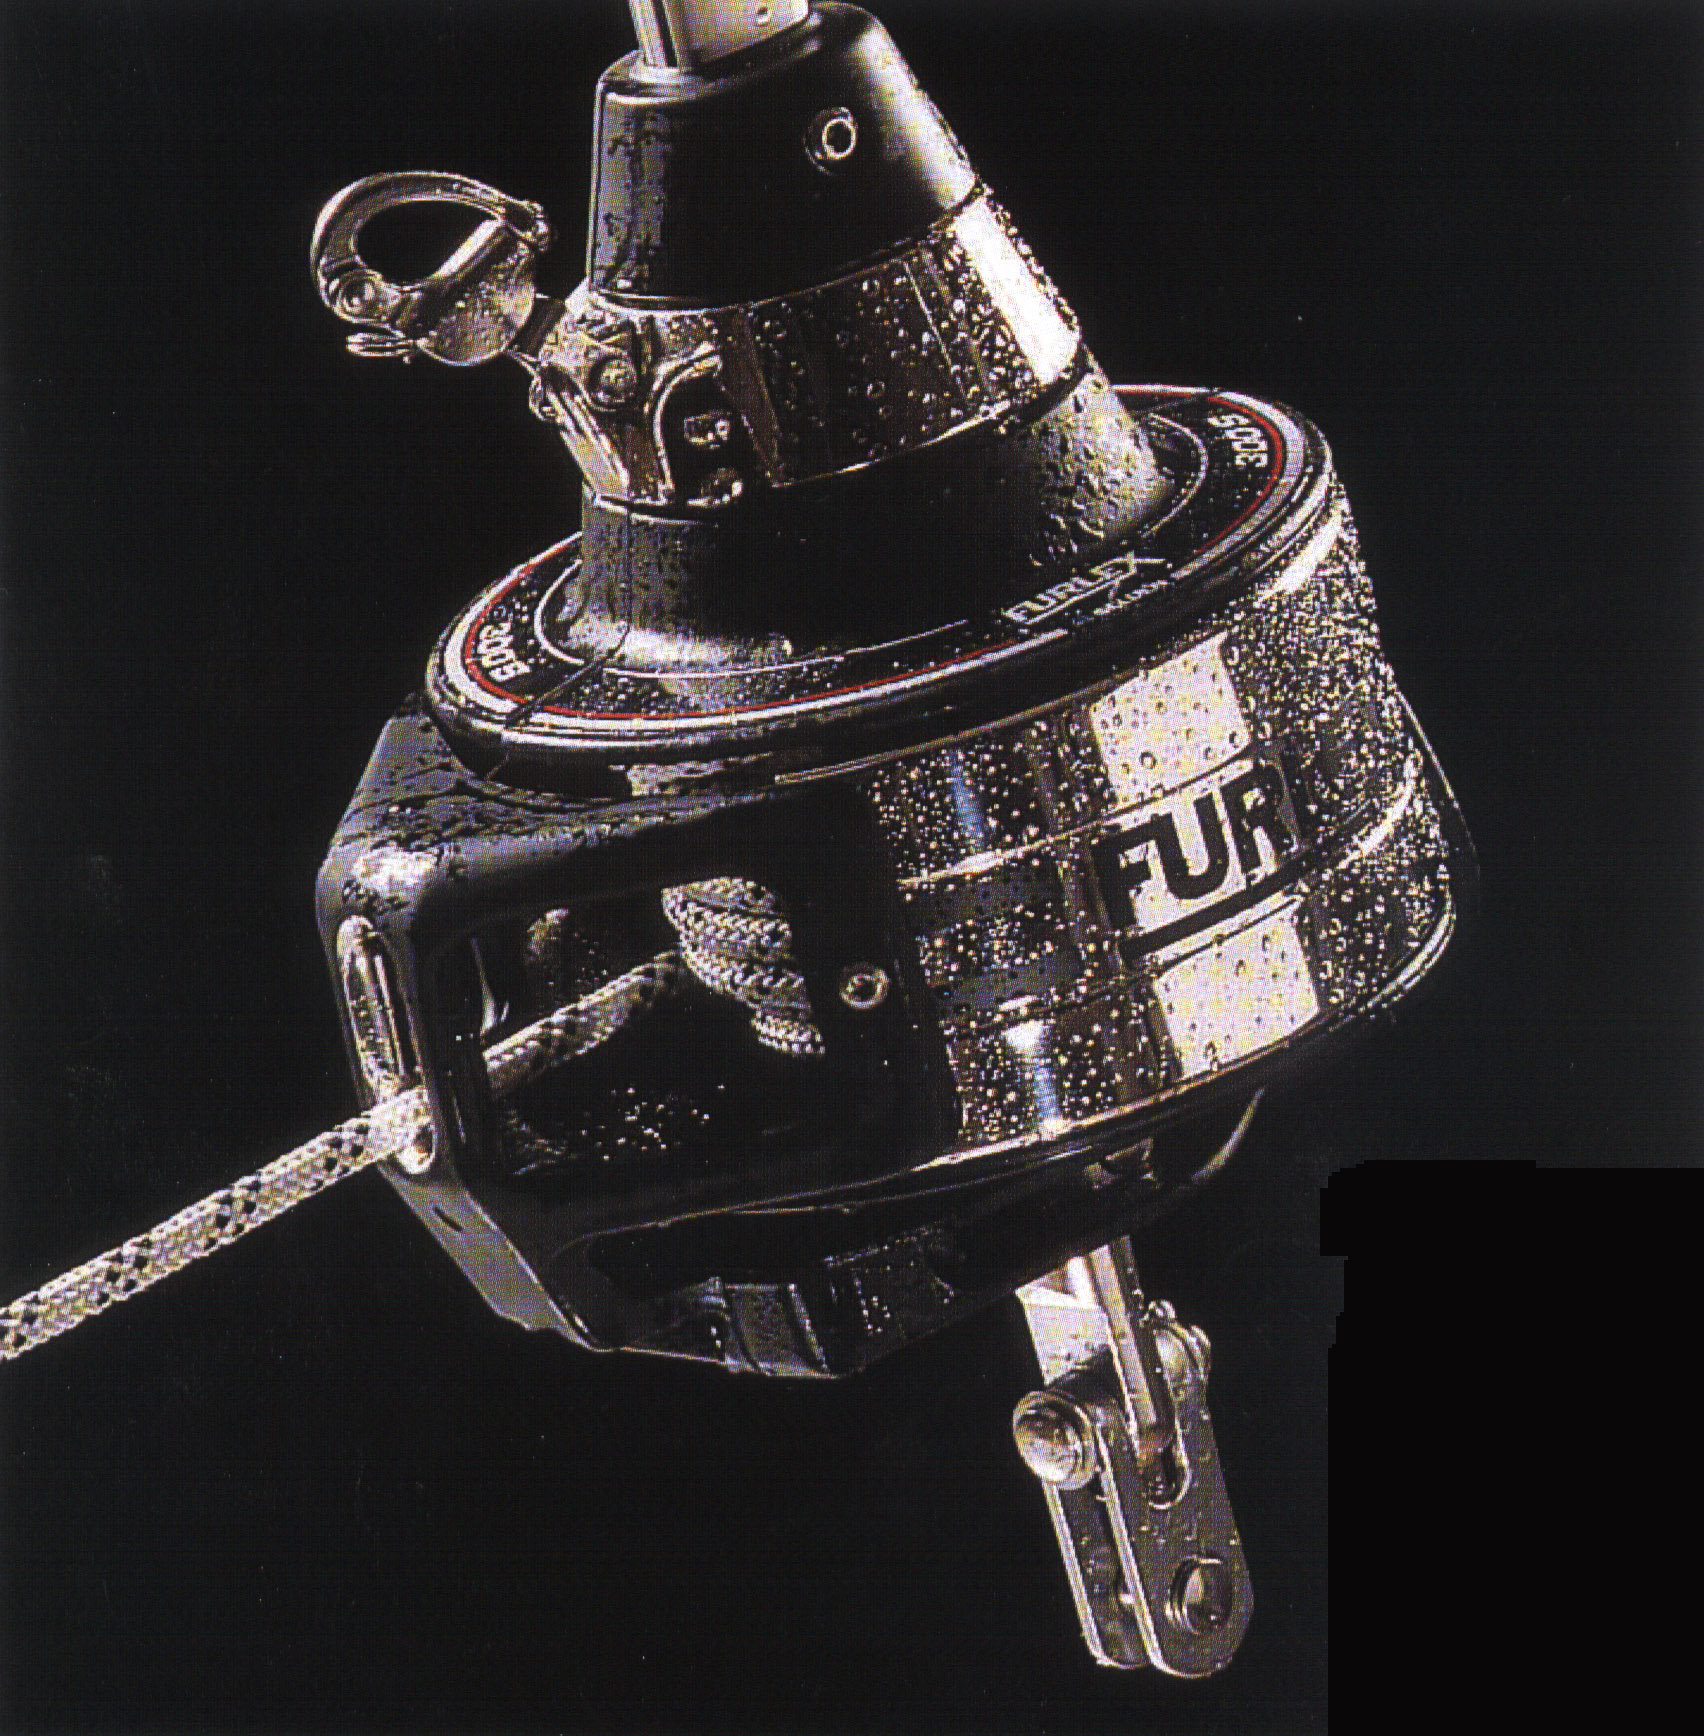 |
There are two basic systems types for furling or reefing a sail. One system type made for very large yachts operates hydraulically. Most average sailors use the two other system types, using drums with control lines, which covers the majority of boats, so I won't dwell on hydraulic units in this article. One type uses a spool-like drum which collects the furling line used to furl the sail when pulled. Imagine the sail completely furled around the forestay extrusion. The furling line to the drum, which leads to a cleat in the cockpit, has been payed nearly all the way out. When you pull on a jib sheet attached to the clew of your headsail, the spool in the drum rotates collecting the furling line much like a reel does when you crank in your fishing line. When it is time to furl the sail, you uncleat the sheet and pull the furling line and the sail rotates around the headstay extrusion. The second type is a drum consisting of a V-jam cylinder like what's used in a self-tailing winch. This accommodates a continuous line spliced end to end which leads both parts of the line aft to a cockpit cleat. To furl or unfurl the sail, you uncleat the double furling line and pull on the part that advances the line through the drum in the desired direction to either furl or unfurl the sail. The teeth on the drum grab the line and rotate the extrusion. Like a self-tailing winch has a piece to strip the line off of the drum, there is a piece that strips the line off in either direction so it doesn't jam in the jaws. The tack of the sail attaches to the top of the drum and the head attaches to a swivel which is hoisted by the jib halyard.
Generally a system with aluminum extrusions are more sophisticated in their engineering and design and hence more money than the flexible extrusions. You will find both kinds of furling drums using either the single line contained within a cage like a fishing reel holds fishing line or a jaw mechanism for a continuous line as used in a self-tailing winch method. The former is becoming more popular than the latter and one reason is because the end-to-end splice required in the continuous line is difficult to do and if done improperly, is too large to fit through the jaw mechanism, which jams, and that obviates one of the goals of a system - uncompromising furling. The other reason is the drum that collects the line seems more straight forward for operators and is not as susceptible to line or drum wear.
Split drums, for the racing enthusiast, are found only on certain models that hold the line on a spool. Depending on the manufacturer, the splitting of the drum can take place in minutes with few, if any tools, while others are more involved requiring more tools and time. Whatever you do, don't drop the pieces or tools overboard. If you remove the split drum for racing, you then attach your headsail tack to the orginal stem-head fitting location, attach the halyard to the head of the sail and hoist using the luff groove in the extrusion. The upper swivel remains out of the way at the bottom of the extrusion after the sail feeder is removed. On some systems you may have to disassemble the sail feeder to let the upper swivel by and then reattach it again. One furling manufacturer uses its own halyard system on some of its units so that you have no use for the existing halyards on your mast. So, if you are a racer and require two luff grooves for fast headsail changes, make sure you buy a system that uses your two halyards required for a non-bald-headed sail change.
TIPS ON PURCHASING
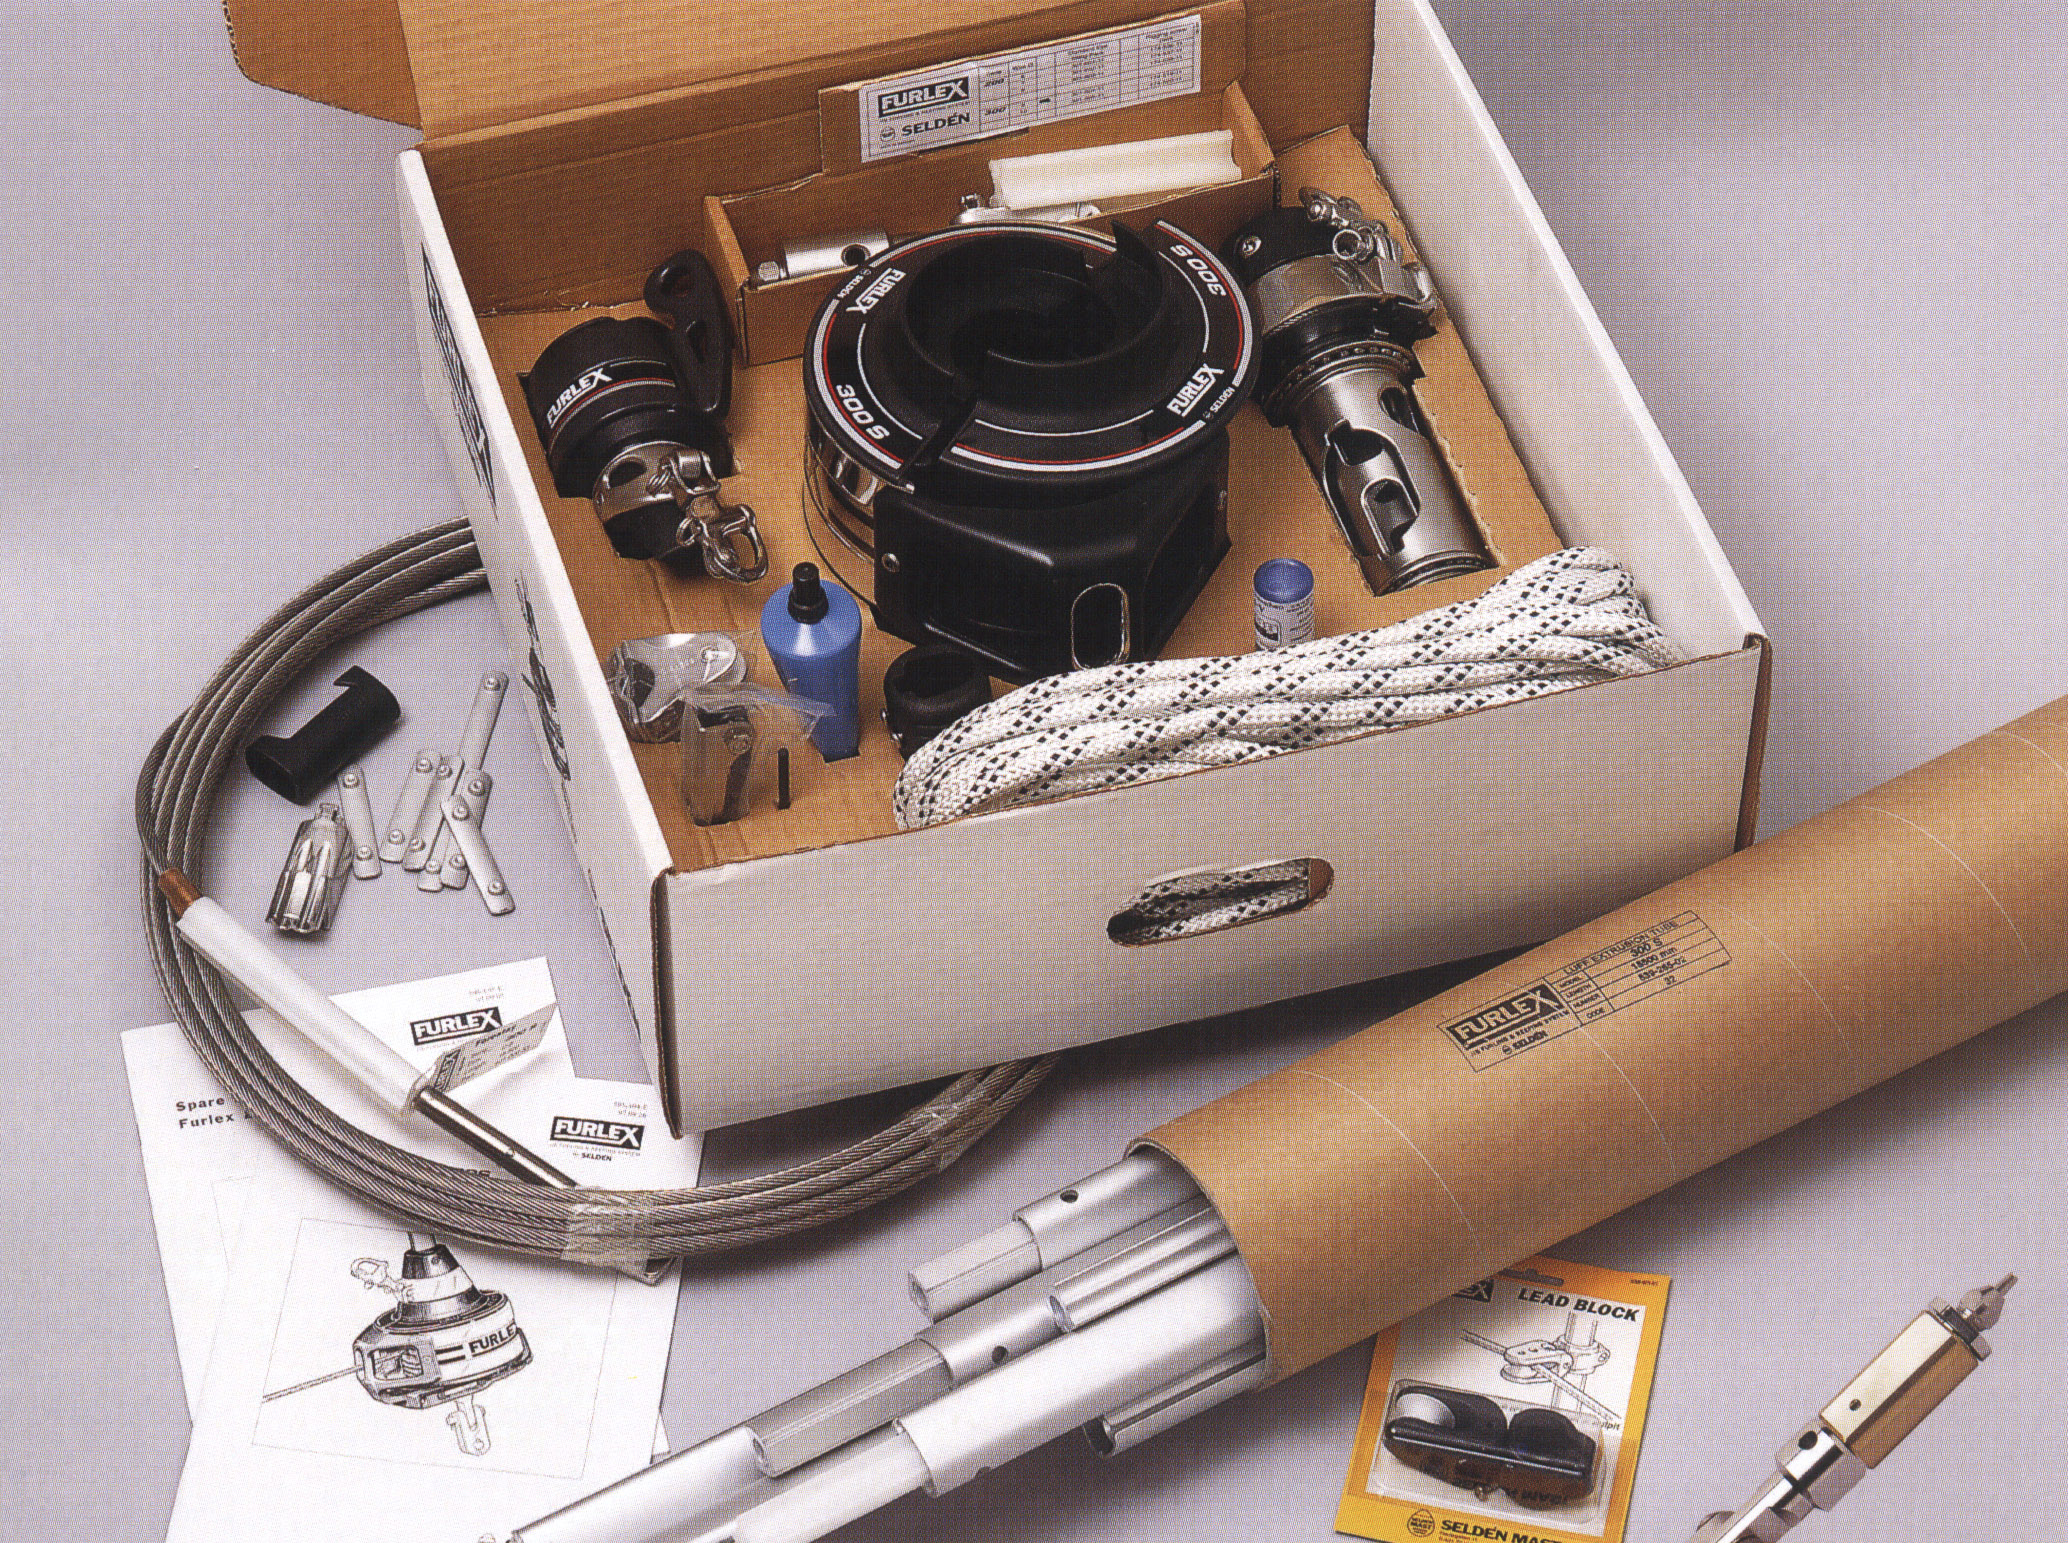
As with anything, you get what you pay for and you must balance your needs and your budget with the available products. While, as before mentioned, systems with aluminum extrusions tend to be more sophisticated and expensive, there are differences. Bearing construction and materials vary, as do methods of extrusion attachment. Some manufactures like Furlex include all the components needed for a near complete installation (no cleat), while others offer some equipment like the cleat, blocks to lead the line aft and the halyard retainer as optional kits. Some systems use your existing forestay turnbuckle, while others discard them and incorporate their own adjustable feature as standard or optional equipment. Some don't use adjusters at all. With some flexible furlers ball-bearing features are optional. So, when pricing out a furling system, consider your need, consider your budget, consider all the parts needed (more on this below), and compare the quality differences. Lastly, as a matter of the entire expense to make the system whole, consider sail modification or replacement, as well as freight and installation should you elect to not put it together yourself.
TIPS ON INSTALLATION
Most manufacturers include a complete and detailed step-by-step instruction manual for the do-it-your-self consumer. By all means, read the manual before beginning your project. The old "measure twice and cut once" concept is particularly important here. While most manuals are well written and very detailed - designed to make this a fail-safe project, measure 3 times before cutting to be sure or you might be back to the store to order a new forestay or another extrusion piece.
1. Before you buy any jib furling system, obtain your pin-to-pin forestay measurement before you either remove or unstep your mast. When your mast is up and tuned, take this measurement. This will save you a lot of time and aggravation. First you need to know your forestay length (and diameter) to order the right system regardless of manufacturer, and if you do your own installation, exact measurements take the guess work and anxiety out of the required calculations.
2. Consider forestay attachment ends. Before ordering know the forestay clevis pin diameter on your boat to avoid either sloppiness with a pin too small or having to drill out a stem head fitting hole that is too small. Both are not recommended. Furling manufactures should provide the pin size required for your boat.
a) The bottom: The standard furler that does not use your existing turnbuckle usually comes with a bare end at the bottom. Either a mechanical terminal end such as a Norseman or StayLok fitting is attached, or you must visit your local chandlery for swaging on a threaded stud. Important: The latter is done after you have made the required measurement calculations as required in the owner's manual. In the case of some Harken units, you swage on the stud after you have threaded on the required amount of extrusion links provided with the system and as specified in the manual. Some manufacturers include what you need at the bottom and some manufacturers offer you a choice as an option. There are two other installation considerations at the bottom end before purchasing. If your boat has a recess forward so that the drum fits below decks, you must assure that the system's drum is compatible with the space and in some above deck situations, the stem-head fitting is so close to the bow pulpit that the drum might bind against the rail in normal installations. In this case, a space might be needed to raise the drum to clear the rail. This will affect the all-important forestay measurement.
b) The top: Most forestays come with an eye at the top. Some mast manufactures employ different forestay attachment methods, other than the typical clevis pin, designed to fit into their masthead design. You also might need a toggle (if specified in the manual) or special adaptor link or piece of hardware. Whatever you need usually these are all available as an option from your furling dealer. Be sure to consider all these additions when you figure your forestay calculations.
3. Next, consider a halyard retainer. In most installations, a halyard retainer is required to keep the halyard from wrapping around the forestay if the lead from the masthead is not at the proper angle. Some manufactures offer this as standard, some as an option and a few incorporate this feature into their upper swivel. Halyard wrapping is the biggest complaint from new furler owners and the retainer is a simple and permanent fix to the problem.
SAILS
In most cases the average cruising vessel, especially if a masthead sloop rig, will employ her largest headsail for her furling sail of choice, such as a 150% genoa. After all, you can reef it to a smaller size if the wind pipes up. However, some fractional sloop designs, with smaller fore-triangles and larger mainsails, might work best with a smaller, perhaps a 135%, genoa for best results. Some one-design racing classes may use only a blade (95%) jib. Cutter-rigged boats will inventory two different sizes to complete her fore-triangle configuration. You may elect to modify your existing headsail or purchase a new one and it is best recommended that you discuss your needs with your local dealer or sailmaker and boat designer.
 |
Sail modification is another important expense associated with your furling purchase and it is not recommended to endure the expense of modifying a blown-out sail with little or no life left in the material. Sail modification includes removing existing hanks to install the correct size luff tape to fit the unit's extrusion, cutting the luff down to accommodate the upper swivel and lower drum addition and installation of the sacrificial cloth or UV protection. As mentioned before, luff tape can include foam or rope along the leading edge to offer a better draft or shape when partially reefed. UV protection is sewn or stuck onto the leech and foot of the sail on the side of the sail that is exposed to the sun when furled. You can have a Sunbrella material attached to match your sail cover, but while esthetically nice, it is heavier than an alternative white stick-on material that a racer would rather purchase to reduce weight.
If you opt for a new sail, discuss fabric choices and designs to suit your needs with your sailmaker. Where you sail, the climate and sea conditions, or whether you race or cruise will affect your choice of sail, material and cut.
Whether you buy a new sail or modify your existing one you or your dealer should work closely with your sailmaker to assure the correct modification for a proper fit. The no-brainer way is after your system is installed, you can measure the distance between the shackle at the bottom of the upper swivel where your head now attaches and the shackle at the top of your drum where your tack attaches. But, you might wish to have the sail ready as soon as your furler is installed so you don't have to wait to go sailing. Sail-making or sail-modification guides are usually included with the owner's manual so that you accomplish the sail work in advance.
By now you should have a basic understanding of jib furling systems. Do your homework on the various systems offered on the market, make a choice and enjoy a new dimension of care-free sailing.
Bill Hooper owns Hooper’s Yachts in Afton, MN. He can be reached at 651-436-8795.