 |
Excerpt from Maximum Sail Power:
The Complete Guide to Sails, Sail Technology and
Performance
by Brian Hancock
(Nomad Press, $44.95). Copyright 2003. All rights reserved.
A STITCH IN TIME
|
Sail Care and Repair
A book that claims in its subtitle to be a comprehensive guide to everything
about sails, is nothing about sails unless there is a chapter on how to repair
them. Ultimately, a compromised sail inventory is not only bad for performance;
it can affect the safety of both the boat and crew. Knowing how to care for your
sails and repair them while you are at sea is a fundamental part of good
seamanship. In fact, it's up there with knowing how to deploy and use storm
sails. If you find yourself on a lee shore without an adequate inventory you
might rue the day you turned down a lesson on basic sail repair. Note that while
your local sailmaker will know how to do fancy repairs that blend into the rest
of the sail, this chapter is more about how to effect a rudimentary repair while
under way and how to take care of your sails on an ongoing basis. First let's
look at basic sail care.
Sail Care
A number of factors contribute to sail wear and tear including excessive
flogging and prolonged exposure to sunlight. The delicate yarns used in
high-tech racing sails are especially vulnerable to these two forms of
degradation. Other forms of wear and tear are all too familiar to many cruising
sailors. Chafe, for example, is a big factor as is using the sail out of its
engineered wind range. Finally, there is the issue of moisture and mildew.
Flogging
Modern fibers are very sensitive to being bent, and over time even the best
sails will find a natural hinge around which to bend, which sooner or later will
become a weak spot in the sail as the yarns break down and disintegrate. Letting
sails flog is the principal contributor to this bending, and while it's
impossible to prevent a sail from flogging on occasion, you should be aware of
this problem and keep the flogging to a minimum. For example, when setting a
mainsail many boat owners motor into the wind at speed while the sail flaps
crazily back and forth, whereas it's only necessary to have sufficient speed to
keep the bow pointed into the wind. By doing so, you can minimize flogging.
Walking on sails has a similar effect to flogging. Many sailors think nothing of
stepping or sitting on bags of Kevlar sails, but the constant creasing
ultimately damages the fabric. If possible, roll the sail when it's not being
used and stow it out of the way. While it's natural to attempt to fold a
headsail on its original crease, avoid doing so. The crease will only form a
weak spot in the sail.
Sunlight
The other ingredient to a good day on the water (other than wind that causes
flogging) is sunshine. Unfortunately, as stated earlier, many fibers are
extremely UV sensitive and lose much of their strength from constant exposure to
sunlight. All fabrics will eventually break down, some quicker than others, so
making an attempt to keep sails covered when they are not being used will pay
dividends down the road. In Chapter 2 we learned about fibers and the degree to
which they are able to resist UV degradation. The following list, ranked from
worst to best in their ability to resist UV degradation, are the fibers
mentioned in Chapter 2:
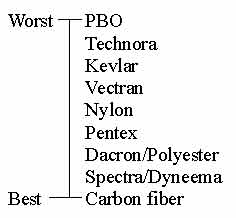
Fortunately for cruisers, other than carbon (which is of no use because of its
brittle nature) the fabrics most commonly used for cruising sails - Spectra,
Dacron, Pentex, and nylon - are ranked relatively high. That's not to say you
shouldn't take care of the sails. Indeed if you plan to spend a lot of time in
the Tropics then you really need to take extra care when it comes to protecting
your sails from the highly damaging effects of ultraviolet rays. This means
keeping the sail cover on the main when it is not in use, and the headsails in
their bags. Also consider adding strips of UV material to the leech and foot of
your roller-furling sails if you have not already done so. You should remember,
however, that even these covers lose their ability to protect the sail from the
sun. Boom covers and sunshields get threadbare over time and as the fabric ages
the sun will be able to penetrate through to the sail. For real bullet-proof
protection you might consider having a mainsail cover built that has a foil
liner on the inside. The foil liner is the same material that is used for making
space blankets and it completely blocks the sun's harmful rays. An investment in
a bullet-proof cover and UV-prohibiting films and adhesives when the sails are
new will also help extend the life of the sail.
 |
| On a rig like the one on Drum, chafe patches were a must. In addition to having the patches someone was sent aloft daily to check for chafe and other kinds of wear and tear. |
Chafe
This is something that occurs on all sailboats, although it's passagemakers and
long-distance racers who are most sensitive to the problem because their sails
are subject to long hours of continual use. Fortunately, you can do quite a bit
about it. Racing sailors, for example, can install spreader patches to take the
abrasion off the fabric as it is dragged over the spreader ends each time you
tack. They can also install stanchion patches to compensate for the sail rubbing
up against these pieces of hardware. Cruisers can not only take the same
precautions, but take the process even further since they are usually less
concerned about weight. For example, an additional chafe strip can be sewn along
the foot of the sail where it clears the lifeline, and seams that rub against
the mast and rigging each time you tack can be covered with a layer of
sticky-back Dacron to protect them. Full-batten mainsails are particularly
vulnerable to chafe where the hard surface of the batten comes into contact with
the rigging or lazy jacks, so if you are planning on sailing downwind for a long
period of time and the batten will be rubbing up against the rigging, have your
sailmaker sew a length of webbing on either side of the batten pocket.
There is also a lot you can do on the boat and rigging itself to help minimize
chafe. Take some time to go over the boat carefully in search of snags. Cover
exposed cotter pins with tape and silicon, and where you can, cover rigging with
leather. Cover the spreader ends with leather or tape them with sticky-back
Dacron so that there are no sharp points to snag the sail. This extra effort
will really help your sails last longer.
Using a Sail Beyond Its Designed Wind Range
When sailmakers engineer a sail they realize there are times when a sailor is
going to be caught carrying too much canvas, so with this in mind they build in
a significant margin of error. As a result, don't panic if you find yourself in
a situation where the sails are overloaded, since it's likely that the sails,
especially if they are new, will be able to withstand the extra load. This does
not mean, however, that you can fly your sails in any conditions with impunity.
Sailcloth has a certain yield from which it will recover, but continually
pushing the sail to or beyond its yield point will only lead to problems,
especially with sail shape. If you measure the life of a sail by how long it has
a decent shape, rather than by how long it's a triangular piece of fabric, then
you need to be sensitive to a sail's yield point and sail your boat accordingly.
Moisture and Mildew
It's inevitable that sails on a sailboat are going to get wet, so if you want
your investment to last longer it's important for you to make an attempt to dry
the sails when you are finished with them. A long-distance cruising sailor may
laugh at the idea, and with fair reason. But racing sailors, weekend cruisers,
and daysailers do have an opportunity at day's end to dry and stow their sails
properly, and they should always be sure to do so.
If the sails are made from woven Dacron, for example, the salt particles in salt
water will work their way into the fine yarns of the fabric. Later, when the
water evaporates, they will become tiny salt crystals with razor-sharp edges.
These sharp edges chafe at the fine fibers, snapping them one by one and slowly
breaking down the fabric. The resin coating on new Dacron fabrics makes it
difficult for the salt to penetrate, but over time this resin will break down
allowing the diluted salt crystals to penetrate. Your best bet is to rinse the
sails with fresh water and let them dry in a warm shady place.
Laminated sails, especially those with the film on the outside, are not as
susceptible to salt as their Dacron counterparts, but it is still a good idea to
rinse them off after they have been used since some fabrics are more prone to
mildew than others. Bear in mind that usually it's not the fabric itself that
attracts mildew, but rather the dirt and oils that collect on the surface of the
sail. If you see a mildew spot it's best to treat it right away with a squirt
from a cleaner like Tilex, which can be found on the shelves of most
supermarkets.
Nylon is especially vulnerable to dampness, since when it is wet it loses as
much as 15 to 20 percent of its strength. If you stash your spinnaker away still
wet and then attempt to set it the next day in a stiff breeze, be careful. The
sudden shock loading that occurs when the sail fills could cause it to explode.
Your best bet is to wash your spinnakers with fresh water and then dry them on
the lawn before using them again.
Another reason for washing sails to rid them of salt is the fact that salt eats
away at hardware (like leechline cleats or blocks) mounted on the sail.
Therefore, cleaning and drying your sails will not only prolong the longevity of
the fabrics, but also that of the other pieces of equipment that are essential
to making them work as well.
Sail Repair
As is so often the case in sailing, preparation is key, and carrying good sail
repair equipment on board will allow you to fix most damaged sails. A sewing
machine is nice, but not essential, and your decision about carrying one on
board will be determined by the area where you are sailing and the types of
repairs you want to be able to do. Basically there are two ways to approach each
repair - a quick fix to help you make it to the next port, or a more elaborate
job as good as any done by a sailmaker in a sail loft. If you are cruising
remote islands, the chances of finding a sailmaker will be equally remote, and
you should take a sewing machine on board and learn how to use it. If you are
hopping up the East Coast of the United States, leave the machine behind and
learn how to do quick patches so that you can make the next harbor safely since
this region has lofts aplenty. Either way there are some basic techniques you
should learn.
First, no matter what the job, you will need to do a quick damage assessment, a
job that requires a flat wooden surface, sharp scissors, and a helping hand. If
the rip is in a high-load area of the sail, you will fix it differently than if
it is in a low-load area. The edges, for example, especially the leech and foot
of the sail, will need quick and careful attention, while a rip in the middle of
the sail can be slapped closed with a piece of sticky-back Dacron and left that
way until you have time to do a proper job. For example, I once sailed over 300
miles with a hole in the middle of my spinnaker. It snagged on a shackle as I
was hoisting it, but the rip was far from any load area, and there was no danger
of the hole enlarging. I had run out of sail repair material so that's the way
it stayed. If the rip had been near the luff or the corners, I would have been
forced to drop the sail and not use it.
| Repairing downwind sails • Do a damage assessment. • Clean the torn area with fresh water or alcohol. • Lay the sail on a smooth surface and piece the edges together. • Trim the frayed edges. • Patch with sticky Dacron (temporary) or nylon strips (permanent). • Remove the temporary patch if doing a permanent patch. Repairing working sails • Do a damage assessment. • Clean the torn area with fresh water or alcohol. • Lay the sail on a smooth surface and piece the edges together. • Trim the frayed edges. • Patch with sticky Dacron building up the layer to the required strength. • Sew the patch to the sail (especially if in high-load area). |
Sticky-Back Dacron
This simple product is one of the most important pieces of equipment on any
boat, especially one heading offshore. Sticky-back Dacron is simply Dacron tape
with an adhesive backing and is to the sailmaker what duct tape is to a boat
builder: an indispensable item. It comes in various weights, but the three-ounce
Dacron is the most versatile and also seems to have the best adhesion. You can
build up to a required weight by layering the Dacron, doing so in a gradual
transition so you will not end up with a "hard spot" at the edge of the patch
that acts like a hinge and later becomes a weak spot in the sail. Before adding
any sticky-back, make sure that the area to be patched is clean and dry. Wipe it
clean with fresh water or better still with alcohol (not your best gin, but an
industrial type). It is important that there is no grime or grease on the sail.
Sticky-back will adhere to damp Dacron, but the bond will be much better if the
sail is clean and dry, and better still if you are able to heat the sail once
patched. Use a hair dryer or leave the sail in direct sunlight. The heat softens
the adhesive and it bonds better. Use sticky-back for repairing all Dacron sails
and for a quick fix on spinnakers, although it's not a good idea as a long-term
repair on the latter since the Dacron is not compatible with nylon and will form
a hard spot in the sail that could end up ripping after some time. You can use
ripstop nylon tape for repairing spinnakers, although it does not have the
adhesion of sticky-back Dacron and usually needs to be sewn down. Ripstop nylon
tape is the same as sticky-back Dacron except that it's made from nylon fabric
rather than Dacron.
You can also use sticky-back Dacron for repairing laminated and molded sails. In
fact, it's especially effective when the outer layers of the fabric are film
since it adheres extremely well. In general, with lighter fabrics sticky-back is
probably best left unsewn since the needle holes only serve to weaken the base
fabric.
Patching
The key to good sail patching is to lay the repaired area out flat and piece the
edges together where you would want them to be when the sail is repaired. Use
the underside of one of your wooden floorboards for a level surface and secure
the fabric using your awls and pins. Trim off any frayed edges and pulled
threads to allow the fabric to lay flat. Cut strips of sticky Dacron wide enough
to cover the gap and carefully place them over the torn area. It's important to
have the repair come out as smooth as possible since a hard spot will be a weak
spot in the sail. Work from the center of the sail out toward the edges so that
if your repair does not match up exactly, you can trim the excess fabric. If you
work in toward the middle of the sail and find that there is excess you will
have a problem. You can't simply cut off a chunk of fabric from the body of the
sail.
On a Dacron sail decide how many layers of sticky-back you will need to build up
to the sail fabric weight and layer them over your initial patch making each
successive patch larger than the one before. Remember that the sticky-back
weighs 3 ounces so divide the fabric weight by three to see how many layers you
need. It's okay to go an ounce or two over, but don't overdo the patch. Again,
you want to avoid a hard spot in the sail that could present a problem down the
road. A 12-ounce patch on a 7-ounce sail is a problem waiting to happen.
Patch both sides of the sail. If you are repairing a rip in the middle of the
sail and you are able to clean and dry the sail before patching it, you will not
need to sew the patch. Simply lay an extra-large patch over the area and allow
the adhesive to hold it all together "in sheer." As you near the leech, foot, or
corners of the sail you will need to sew the patch since these are areas that
experience higher loads. When doing so you might want to lay a piece of regular
Dacron under the sticky to add strength to the repair, using the sticky to hold
it in place. For a simple patch use a straight stitch - basically an
up-and-under stitch that runs in a straight line - keeping each stitch no longer
than a half-inch long and sewing both sides of each row of stitches. Sew in one
direction first and then sew back in the other direction using the same holes
until each stitch has thread either side of it. If you are sewing through an
area of heavy material, first bang holes in the fabric with a hammer and awl
before sewing, then snap the sharp end off your needle and sand it to a blunt
point. It will follow the awl hole with its blunt point and not try to make a
new one of its own.
When using sticky-back Dacron for a quick repair on a nylon sail, apply
extra-wide patches near the leeches and sew the leech tape back on with a sewing
machine or by hand. Because the sail is too big for the small area on board,
sketch the repair and come up with a plan before starting, once again working
from the center of the sail out toward the edges. If you are planning on doing a
proper repair, follow the same procedure for a temporary repair, and then turn
the sail over and patch it properly with strips of nylon the same weight as the
spinnaker. Cut the nylon and lay double-stick tape down the edges. Change the
direction of the patch at each seam to match the thread direction of the fabric.
Your temporary repair will hold the sail together allowing you to patch with
nylon. Remove the backing on the double-stick tape, lay the fabric down smoothly
and then sew the patches with your sewing machine. Once the nylon patches are
sewn down, turn the sail over and cut away the temporary sticky-back Dacron
patch with scissors. Cut along the edge of the stitching on the permanent patch,
and remove the fabric and sticky-Dacron. Finally sew a row of stitching down the
seam and across the new patch to hold it all together and aid the transition of
the patch into the sail.
If a corner ring pulls out, you can replace it with one of your spare rings.
Eyeball where the ring should be positioned, and lay strips of 2-inch nylon
webbing through the rings and onto the sail. Use double-stick tape to hold the
webbing in place, stagger the ends of the webbing so that their transition into
the sail is gradual and then secure the entire repair together with a layer of
sticky Dacron since it will be easier to sew the webbing if everything is held
in securely in place. Follow the same procedure of banging holes in the webbing
with an awl and then sewing it with blunt needles. Put in a few rows of zigzag
stitch, being careful to pull each stitch as tight as you can.
If you run out of sticky-back Dacron and double-stick tape, spray adhesives work
quite well to hold the fabric in place. So does a glue gun, although you will
have to sew the patches down since the spray glue and hot glue do not have a
strong enough bond.
There is nothing difficult about repairing your own sails. Like most everything
in sailing, a little common sense goes a long way. Good preparation, a little
patience, and a good sail repair kit are all that you need. Here then is what a
good sail repair kit will contain.
Sail Repair Kit
Your onboard sail repair kit will be as comprehensive and varied as the passage
you are planning and should be tailored to suit your needs. Store the bulk of
the items in a bag in a dry, convenient place, and have a smaller bag containing
items that you need more often in a more accessible place. The smaller bag
should include:
• scissors
• wax thread
• needles
• whipping twine
• some sticky-back Dacron
Keep the needles in a tight container wrapped in a cloth that has been lightly
soaked in sewing machine oil. Also wrap your scissors in an oiled cloth, since
even though they are stainless steel they will rust if not protected. Roll the
pieces of nylon, sticky-back Dacron and regular Dacron tightly, and hang them in
a waterproof chart storage tube from the overhead in your forepeak.
A basic sail repair kit will include the following items. Amounts will vary
depending on the size of your boat and the trip you are planning. The amounts
noted here would be suitable for a 40-foot yacht planning a transatlantic
passage.
• 1 pair stainless steel scissors
• 1 pair regular scissors as backup
• 1 knife dedicated to sail repair
• 6 awls to secure the sail while patching
• 2 dozen push-pins with plastic heads to secure the sail while patching
• 1 adjustable hand palm for hand sewing sails
• 3 seam rippers
• 1 roll of pre-waxed hand sewing thread
• 1 roll of sticky-back Dacron tape 5 inches wide
• 10 feet of sticky-back Dacron 54 inches wide
• 5 rolls of double-stick tape
• 2 cans of spray adhesive
• 3/4-inch tubular nylon webbing
• 2-inch nylon webbing
• 2 stainless steel rings with bar
• 10 feet of Velcro
• a selection of needles, size No.14 and 15
• staple gun and staples
• lump of wax
• assorted pieces of Dacron and nylon
A more comprehensive kit would also include:
• a spare set of battens
• spare hanks
• a spare luff tape the length of your longest headsail
• leechline cord twice the length of your mast height
• an entire corner patch of one of your spinnakers
• hot knife
• Nicropress tool and sleeves
• Hole cutter and assorted rings
• 20 feet of seizing wire
|
Sail Repair at Sea My second Whitbread Race was aboard Drum,
the British yacht owned and sailed by Simon le Bon, the lead singer of the
rock group "Duran Duran." The sails on Drum were huge. It was in the days
when the Whitbread was raced under the old IOR rule, and we raced with more
than 20 bags of sails on board. The headsails were masthead and made from
Kevlar. They were massive and very difficult to repair. We had to lash them
as tightly as we could and hammer the fabric through the sewing machine in
order to carry out even the smallest repair. The spinnakers were 5,000
square feet, and when they blew out they came down to me, the sailmaker, in
a dozen bits of wet nylon. I had a 4-by-4-foot piece of upturned floorboard
as my repair loft. To repair the spinnakers I had to first dry the torn
edges with a hair dryer. Then I trimmed the frayed bits before trying to
figure out where each piece went. Fortunately I was good at jigsaw puzzles
and always managed to get the sail back together. |
Determine the Condition of Your Sails
The end of the sailing season is a natural time for you to take stock of your
sail inventory and go over each sail to evaluate its condition. You can ask your
sailmaker to do the checking, but it's not rocket science and you can save
yourself some money if you do it yourself. All you need is a dry lawn and some
time on your hands. This might also be a good time to give the sails a final
rinse in fresh water before stowing them for the season.
Check Fabric
It's fairly easy to gauge the integrity of your fabric, especially a woven
Dacron. Take a blunt edge like the back of a knife and rub the surface of the
sail. If it comes up shiny and smooth where you rubbed then you know that the
fabric is still in reasonably good shape. If, on the other hand, the fibers
start to get fuzzy then you know that there has been some UV degradation and you
need to be concerned. In some cases you might be able to rub a hole in the
fabric in which case the sail will have to be replaced. If your sail has ripped
during the season, take note of how it ripped because it will give you some
clues as to the condition of the fabric. Smaller yarns degrade and break quicker
than the larger yarns and in most cross-cut sails the small yarns are found in
the warp, especially if the fabric is fill-orientated. If the sail developed a
rip parallel to the leech, in other words across the warp, then you can be sure
that some degradation has occurred to the smaller warp yarns. The same amount of
degradation will have occurred to the fill yarns, only it will take longer for
it to show.
Check Seams
Seams are the most vulnerable areas of sails and a thorough check of each one
may save you a costly blow-out down the road. If your sailmaker used colored
thread it will make your job a lot easier. If not, examine each seam for loose
or broken stitches, and mark each place with a piece of colored sticky Dacron.
Hold the sail up to the light and determine whether you can see daylight through
the stitch holes. If you can, it's a sign of impending trouble, since it means
the seams have been overloaded and are vulnerable to blowing apart. Pay
particular attention to the areas around the corner reinforcement patches. If
the last row of stitches show sunlight through the stitch holes, it may mean
that the corner patches are not large enough or strong enough for the sail, or
that you have overloaded the sail on more than one occasion. Have your sailmaker
either re-sew the seam or possibly extend the reinforcement patch.
Check Hardware
It's important to take a close look at the sail attachment hardware like batten
cars, luff slides, and hanks to see if there is any wear and tear or hairline
cracks. The cars on the inboard ends of battens are often under a compression
load, while the intermediate slides are under tension. Look for wear, paying
particular attention to the slides at the head of the sail and above each reef,
since these are the ones most heavily loaded. Check the webbing and stitching
that hold the hardware to the sail to be sure that it is still strong.
Hanks generally do not fail, but it's worth checking each piston if it's a
piston-hank, or spring if it's a Wichard-type hank to see if it works properly.
Sometimes a halyard gets in behind the piston or spring and bends it so that it
does not close easily, or worse yet, it does not close at all. If there are hank
reinforcement patches on the sail check them for chafe; if not, check the sail
to see if there has been some noticeable point loading on the fabric.
Also take a close look at the leechline cleats and other hardware that is bolted
to the sail. If the sail has been put away wet, these small aluminium pieces are
the first to feel the effects of corrosion.
Look for Chafe
It's important to check the sail over for chafe even if you have chafe
protection spreader patches or the like. By the end of a season the light Dacron
chafe protection could have worn through and will need to be replaced. Batten
pockets are always vulnerable to chafe and should receive extra attention. The
same applies to the edges of the sail like the bolt rope along the luff of a
mainsail or the foot of a genoa where it passes over the lifelines. Make notes
and mark the sail with a piece of colored sticky Dacron where it needs
attention.
Replace UV Protection
The sunshield on cruising headsails is good for a number of years depending on
where you sail, but it's not good for life and so you should replace them every
few years. This is especially true if you live and sail in the Tropics. Remember
that the acrylic fabric is being exposed to the blazing sun all day every day
whether or not the sail is being used.
Maintaining Your Investment
Sails are a big investment, not only in terms of hard-earned money, but also in
time and energy. It's important that they be taken care of and thoroughly
examined on a regular basis. There is nothing quite so disheartening as a sail
blowing out, and blown sails are almost 100-percent avoidable. These days with
modern materials, sophisticated computer programs for determining loads, and
judicious engineering, a sail should never blow out unless some other factor has
come into play. Chafed seams or a small rip caused by a sharp edge usually form
a weak spot in the sail. It's important to overall seamanship to take care of
your sails, so be kind and cautious and you should never have a problem with
ripped sails.
Brian Hancock is an expert in sails,
sailmaking, and offshore ocean racing,
having made a career as a professional
sailor for almost three decades. He
apprenticed at Elvstrom Sails in South
Africa before leaving the country to
sail around the world. In 1981/82 he
sailed as a watch captain aboard the
American yacht, Alaska Eagle in the
27,000 Whitbread Round the World race.
Four years later he returned for a
second Whitbread, this time aboard the
British yacht, Drum. In 1989 he sailed
as Sailing Master aboard the Soviet
Union’s first, and by happenstance last,
Whitbread entry, Fazisi. With more than
200,000 miles of offshore sailing to his
credit Brian is uniquely qualified to
write about sails and the business of
making sails.
Brian also owned his own boat, Great Circle an Open 50 carbon-fiber, water-ballasted sailboat designed and built for single-handed sailing and Brian did a number of solo offshore passages. Some of his experiences are recounted in his book, The Risk in Being Alive, published by Nomad Press. These days he works on special sailing projects and writes for magazines around the world while raising a family in Marblehead, Massachusetts.